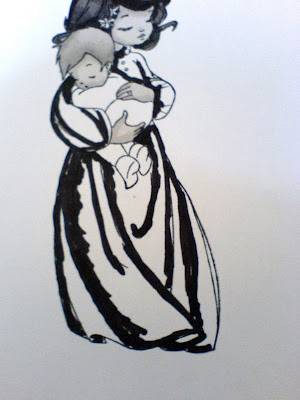
the promarkers i have used are black,cool grey 5,4,3,2,1 and baby pink.
i have stamped the image in memento ink onto tesco executive a4 presentation white card 160gsm.
this is the card i have been using lately and also i have been using a new way of colouring by putting down the darkest shades first.
to buy this beautiful image please click on the whiff of joy link in my sidebar.
so lets get on :)
1.1st off i am doing the skin on mummy and baby.i have started with COOL GREY 2 where i want my darker areas.
 2.now i am going over the cool grey 2 with COOL GREY 1 and blend it in by starting at your darker area and gently drag your paler shade in towards the centre.
 3.now for mums hair.i am starting with BLACK for the darkest area.
4.now i am going over the black and into more of the white with COOL GREY 5 still leaving some white where you want the light to be.

5.now all over the black and cool grey 5 with COOL GREY 4. you may have to do this several times so you really blend and tone the black down so it doesn`t look too harsh.it all depends on your card stock.

6.now onto babys hair starting with COOL GREY 3.

7.then over the cool grey 3 with COOL GREY 2 again leaving a little white.

8.finally to finish babys hair i have used COOL GREY 1.

9.onto mums dress, i have started with BLACK.

10.then over the black with COOL GREY 5 again leaving some white for your lighter areas.

11.all over the black and cool grey 5 with COOL GREY 4, again keep blending until you are happy and the black doesn`t look too harsh.

12.now babys outfit.i wanted this to look quite white so i have started with a little COOL GREY 2.

13.followed by a little COOL GREY 1.i have left some areas white on this one on purpose (honestly )

14.finally i have added a tiny touch of BABY PINK to the cheeks of mummy and baby.
apologies for some blurry pics but i wasn`t feeling too chipper when i did this so hopefully this tutorial has been of some help.
i`d love to know what you think.
ttfn and thanks for popping by.
see you very soon.
luv coops xxxx

13 comments:
Wow Nic thanks for the fabulous tutorial,
Hugs Dianne xx :)
Hi Hun! fabby colouring tutorial thanks for sharing with us all .... final result looks lush xx Lizzy xx :)
FAB tute hun, I do mine very similar, I always start off with darker 1s I find it easier to create shadowed area's that way, not that I'm that experienced I've only been colouring 5 months lol. I may do a tute when I'm more experienced like you hun...maybe next year lol. By the way my biggest fear is using black I always find it harsh but you have done yours brilliantly hun. Hope you are all having fabulous time on your hols.
Lotsa hugs Vicky xxx
Oh yes, it has been of a lot of help, Nic! Cool greys 1 to 5 are the only Promarkers I have (bought them because I was waiting for my grey Copic refills to arrive...) and now I have your awesome tutorial to help me use them (when I tried, wasn't pleased with the result at all:-)!!! So thank you so much for your fabulous explanations and pictures! Hugs Delphine xx
excellent tutorial nic,x
Brillant, that was a beautiful turtoial and I will be watching it again, I have not used a black promakers and would be frighten to do so on figuers, but you have explained it so well and it looks lovely when you finished it. thank you for sharing Hope you are enjoying your holiday Hugs Margaret
Hey Coops, hope you're feeling a bit better x
Thanks so much for this, as someone who is hopeless with colouring and shading ot's really helpful to have step by step - you're a star!!
Have a great weekend
Hayley xxx
wow great tutorial lovely image
looks so effective in black and white i haven't tried a black and white image with my promarkers as yet will have to give it a go
thanks for inspiring me
gill
Brilliant tutorial, thanks for taking the time to do it. I will habe to take the time out to practice now.
Fabulous tute, Nic. It's great to see step-by-step how you achieve something that you do so well!! I'll give it a go when I've got some more greys! Hope you're feeling better soon. Marie xx
P.S. I had given you an award on my blog but I see you'd already got it :-(
What a great step by step guide, thank you!
hugs and xxx
Fab tut Nic, thanks for sharing.
xx
Hey Coops!! :)
I've just put a comment further up on your blog but thought I'd leave one here as well as I meant to at the time!!
Thanks for taking the time to do this- esp when you were feeling so rotten yourself!! :) It came at the perfect time for me as I'd just bought the Cool Greys to use for my Xmas cards- I've been trying putting down the darker colours first lately too and see to be getting on a bit better that way, though still need much more practice and all the help from tuts like this I can get!! :D
hugs, Rachel x
Post a Comment